When building models, whether they are planes, ships, tanks, figures or anything else, the point for most people is to make them look as realistic as possible.
However, this is something that’s sometimes easier said than done. It’s totally doable though if you know how. Let’s see how you can achieve this.
How do you make plastic models look realistic? For more realistic models, pay close attention as you remove, clean, and dry fit the parts before gluing them in place. Fill in any gaps, use authentic colors, apply thin paint layers, avoid obscuring details, and try weathering techniques to ensure accurate results.
In the following, you’ll find 20 tips to help when building your models to make them look better overall and more realistic.
Keep reading to the end for special weathering techniques and some great paints from Vallejo that can help you achieve awesome results.
- How Do I Make Plastic Models Look Realistic?
- Wash Your Parts
- Paint Parts on the Plastic Sprue
- Assemble Correctly
- Use Glue With a Fine Applicator Nozzle
- Use Clamps or Masking tape
- Use Modeling Filler
- Use Fine-Grit Sandpaper
- Leave Delicate Parts for Last
- Use Authentic Colors
- Use Paint Conversion Charts
- Mix Paint With Thinners
- Use Proper Brush Sizes for Specific Parts
- Paint the Lightest Color First if Possible
- Use as Many Coats of Paint as Needed
- Use Masking Tape for Straight, Sharp Lines
- Use Chalks or Soft Pastels
- Don’t Hide Details
- Don’t Cut Corners
- Embrace Critique
- Practice, Practice, Practice
- Weathering a Plastic Model
- Vallejo Products
- What Tools Do I Need for Plastic Model Kits?
- Conclusion
How Do I Make Plastic Models Look Realistic?
Modeling is a great hobby that requires time, patience, and practice to turn a subtle piece of plastic into a remarkable realistic era-specific plane, ship, car, or tank.
Painting your model is not the only factor you need to consider when trying to make your model look realistic.
Wash Your Parts
Many people overlook this first step when starting to build their models.
Washing the parts can help clean off any mold-release residue or gunk, helping the paint stick easier and the parts fit together well.
Paint that is easily applied leaves room for precision, and parts that fit properly look cleaner and neater, making the model look more authentic.
Paint Parts on the Plastic Sprue
If you can always try and paint difficult parts on the sprue. This will give you an advantage over small delicate parts that you can’t easily hold.
Assemble Correctly
Practice assembling your parts before you stick them together, and check the instructions consistently so you know that they will look good when you fit the parts together permanently.
Use Glue With a Fine Applicator Nozzle
Dried super glue on your parts will not make them look realistic. Using a fine applicator nozzle will allow you to stick more delicate parts together.
Use Clamps or Masking tape
If you need to clamp your models to make sure they stick together using pegs of any sort that act as a vice.
For instance, these little guys come 100 to a pack and are just the right size.
This will ensure all parts are attached together correctly and look realistic.

- 2" Long
- 0.8 inch mouth opening maximum
- Metal spring clamps
Use Modeling Filler
For any parts you have stuck together that have gaps use modeling filler.
No model that has gaps will ever look real enough, and you won’t be able to apply paint and any weathering effects to those areas.
Use Fine-Grit Sandpaper
Use fine-grit sandpaper to allow you to scuff up the model for painting and to remove any sprue nubs.
Again, this allows the paint to stick better, and applying paint to a proper surface will allow you to have more control.
Leave Delicate Parts for Last
Any delicate parts that you need to attach to your model should be stuck together last. This leaves less room for error and damage.
Remember, a complete model will look more realistic than ones that are missing or have broken parts.
Use Authentic Colors
You should always try and use authentic colors for your models to give them the most realistic look.
Often the color codes for the models can be found in the instructions, and you can order them without any hassle online or visit your nearest hobby shop.
Use Paint Conversion Charts
If you can’t use authentic colors but you want your models to look the part, then the least you should do is use a paint conversion chart that allows you to match the colors you need.
Check out the Humbrol paint conversion chart for colors that is downloadable here.
Mix Paint With Thinners
To achieve different paint results with applied brush techniques to make your model look more realistic, you should know what ratios of thinners to paint you need to achieve certain paint weathering techniques.
Be sure to read my article “How and Why To Thin Acrylic Paint” for a complete guide.
Use Proper Brush Sizes for Specific Parts
It should go without saying that you should use very thin and fine brushes for detailing, and for larger areas, you should use wider and fatter brushes.
The brushes used will depend on the model and the area being painted. (See my Complete Brush Guide.)
The main thing to remember is that you should use the appropriate brush so as to reduce any visible brush strokes, making the model look more authentic.
Paint the Lightest Color First if Possible
It is much more challenging to make lighter colors show through over a dark color when painting, especially if your paint is mixed with thinners.
When possible, always paint lighter colors first, and then paint darker colors over that.
Use as Many Coats of Paint as Needed
Instead of trying to use one thick coat of paint, opt to use a washed-down color and use multiple coats of paint.
This will reduce the visibility of brush strokes and give your models a more realistic look.
Use Masking Tape for Straight, Sharp Lines
Many models come with or should have specific paint designs on them requiring straight lines.
It is an impossible feat to try and paint straight without assistance.
Use masking tape to mark off the sections that need to be perfectly straight and paint away from the tape onto the model for best results.
Use Chalks or Soft Pastels
Many chalks and pastels are activated by water.
You will scrape them off into your paint and use them as washes, giving your models the desired realistic effect you are going for.
Don’t Hide Details
The devil is in the details, and this is one of the most important aspects you will find that separates an average model from one that looks amazing.
You should consider and paint every bolt, groove, nook, and cranny, taking into consideration the paint color and paint weathering techniques (which we will discuss below).
Don’t Cut Corners
One mindset you can apply that will drastically improve your models’ looks is not cutting corners on the areas of model building that you hate.
You will find that if you don’t enjoy sanding or gluing the pieces together, for example, this will impact the overall look.
If you actively try to focus more on the jobs you don’t particularly like, you will find that your models will come out cleaner, neater, and looking more realistic.
Embrace Critique
If you are new to model building, then one of the best ways to find out what you are doing wrong is to showcase the models that you built and ask other more experienced model builders for help and advice.
They can often give you a tip and perhaps see some flaw in a technique that you have, allowing you to improve.
A long-time veteran of model building, David Hourigan is always eager to share and help avid enthusiasts improve on their skills.
You can find his Facebook page here.
Practice, Practice, Practice
The last thing you will need to make your models look more realistic is experience, which comes through practicing.
You will notably see a difference from your first build to your 50th, and with each build, you will develop your skills.
Weathering a Plastic Model
Weathering your plastic model is probably the best way to make it look more realistic.
We covered all the factors to implement that will give your model a more clean, neat, and realistic look overall, but a good weathering job can be the be-all and end-all of a realistic plastic model.
Use a Pencil
For grooves and joints, you can use a dark lead pencil for coloring in and then later going over those areas with a brush, giving it a depreciated effect.
Oil Pin Wash
With a ratio of approximately 30:70 paint to thinners, use this mixture to paint all the nuts bolts and any other areas that would require shading on your model.
The color used should be dark brown or gray for the effect to work correctly.
Two-Tone Chipping With a Brush
To create a chipping effect, use a light color that corresponds to your model and dab the chipping shapes.
Do not paint them as such because it will look overdone. Use a stippling effect to do this.
With a darker color, dab the interior areas of the lighter color to give the effects full potential.
Oil Dot Filter
This technique creates a faint streaking effect on your model. To do this, use neutral colors and place spots over the areas that you want the effect.
Then with a medium-sized brush dipped in thinners, wipe the paint away, creating the effect.
Speckling Effects
Speckling (spatter) is a great technique to create and blend the pigments of certain areas of your model.
Depending on the area, you would use a dark or light color to flick the paint onto the model.
The ratio of paint to thinners would be approximately 50:50.
Winter Whitewash Hairspray Chipping
This is a fantastic technique to create a weathered winter look.
You would first apply hairspray over your model, giving it a sheen effect.
Then, using your spray gun, you would paint (with white paint) over the areas you want to apply the effect.
The ratio of thinners to paint will be 70:30 because the paint needs to be very thin for this effect to appear realistic.
After that, you would use a combination of small to medium brushes, dipping them in water, and then brushing the areas of the model that you want the chipping effect to show through.
The water from the brush will penetrate the white paint and make contact with the hairspray that will dissolve, creating the chipping effect.
For a visual aid regarding these weathering techniques that we covered, check out this video to give you a detailed description and take you through the steps.
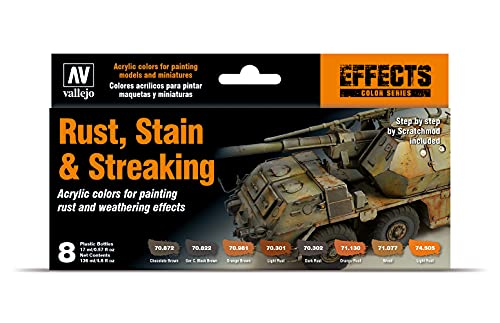
Vallejo Products
Vallejo has a range of paints that make it even easier to make your models look more realistic.
These paints include options that can give effects of rust, corrosion (check out these pigments), steel, streaking, (I love this set to use on cars and tanks) and more.
Using these paints is a fantastic way to create the most realistic models.
They also have pigment binders that are all earth and iron oxides, which are suitable for various climatic and geographical locations.
In addition, other effects can also be obtained using products from their water and stone range.

- Includes 4 different pigments
- Includes a step by step guide
- 35ml plastic bottles
- Each bottle contains an eyedropper device which keeps paint from drying
- Includes a step by step by Scratch mod
- Presented in plastic bottles of 17ml

- The pigments are all earth and iron oxides, suitable for all different climatic and geographical conditions of the terrain
- To adhere the pigment to the surface of the model Matte Medium is used
[amazon box=”B06W52YCTV,B00PGPY4B0,B004GI1YW0″ link_id=”19843″]
What Tools Do I Need for Plastic Model Kits?
These are the basic and most common tools you will need for model building.
- Xacto knife and blades
- Sprue cutters/flush cutters
- Tweezers
- Sandpaper
- Sanding sticks
- Swizzle sticks
- Clamps/clothes pins
- Rubber bands
- Paintbrushes (various sizes)
- Pencils
- Chalks and pastels
- Thinners
- Super glue
- Putty
- Dremel kit
Conclusion
So, we discovered that there are many factors you have to consider in order to make your models look more realistic and that painting is not the most important aspect of model building.
Yes, a great paint job will be the finishing touch, but if your model is not built and put together correctly with the correct procedure, then the paint won’t even matter.
Sources:
http://cs.finescale.com/fsm/modeling_subjects/f/3/t/128467.aspx