![How To Start A Blog In 2024 [Step-By-Step]](https://learn.bloggingtips.com/wp-content/uploads/2024/01/blog_in_a_box_header_1.jpg)
How To Start A Blog In 2024 [Step-By-Step]
Learn how to start a blog in 2024, step-by-step. I'll show you the same process that I've used to start many blogs of my own.
Summary: How to Quickly Start a Blog
In a hurry? Learn how to quickly start a blog in a few simple steps below.
You can always refer to our expanded tutorial for a condensed version of our blogging course. For the full course, view the detailed individual course lessons.

- Get WP Engine or Bluehost hosting
- Download GeneratePress
- Install WordPress on hosting
- Research and select a niche
- Brainstorm and choose a blog name
- Register a domain name
Have you ever wanted to build a blog but don’t know where to start or how to get it off the ground? Then you’ve come to the right place.
I’ve been starting blogs and authority websites for over a decade. I’m now sharing the exact process that I’ve personally used – time and time again – to do so.
I built a simple yet comprehensive guide to show you how to start a blog step-by-step.
This is the same exact method that I use on every authority site in my own portfolio. And it’s proven itself to work time and time again:
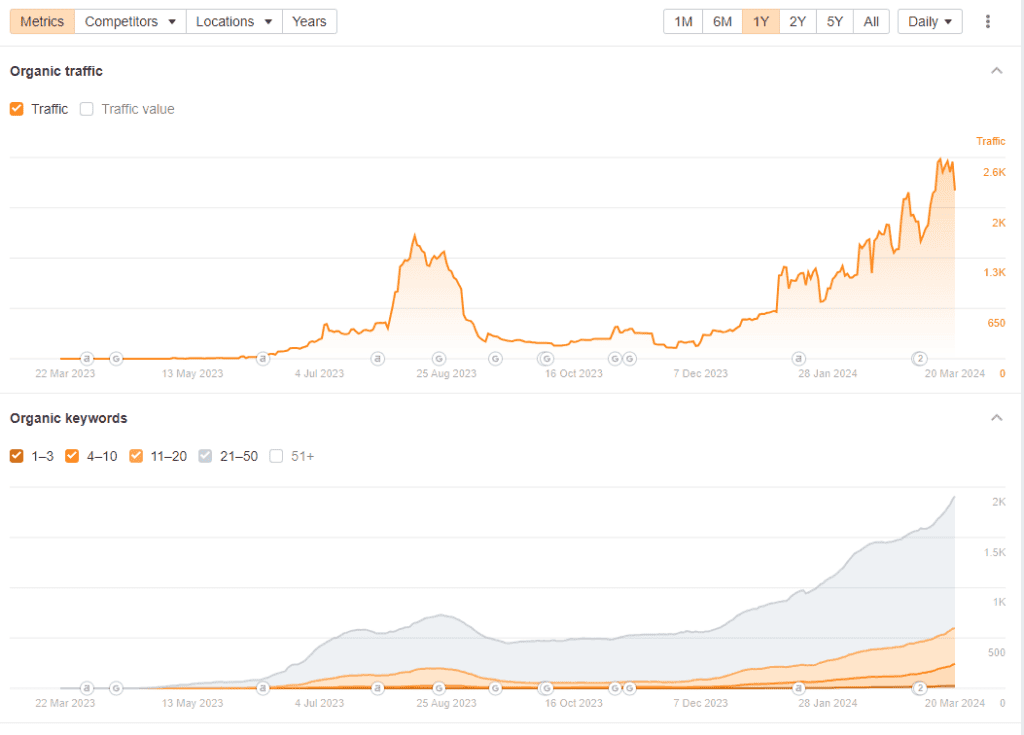
As you can see, the process works—and it works well. And by the end of the guide, you’ll have a fully functioning blog that you can take to the next level.
Before You Begin
This page is a condensed version of the overall course. It will show you how to quickly start a blog, step-by-step.
For a MUCH more thorough breakdown of each step, check out the lessons in the full course content.
You don’t need to do anything to get access. Simply scroll down and read the guides just like you would read a normal blog post.
How to Start a Blog [Quickly] In 2024
If you’re like most potential bloggers, you’re probably overwhelmed with just how many factors go into launching a new blog.
When it comes down to it, though, starting a successful blog really just involves a few simple steps:
Each step can be as simple or as difficult as you want it to be, as you’ll learn with time. My suggestion is to take it slow and enjoy the process.
Now let’s dive into what you came for – how to start a blog.
1. How to Build a Blog
The actual process of building a blog is not that hard to do. In fact, I’d argue that there’s no better time than now to build one because of just how easy it really is.
I’ve built a portfolio of websites from nothing to millions of unique users per month – with nothing but my own skill set, a handful of blogging platforms and tools, and occasional outsourcing to third-party contractors.
You, too, can start a blog with very little investment and achieve incredible results. But… the trick is to build on the right blogging platform, backed by the right tools – from day one.
What You’ll Need to Build a Blog
There are many different blogging platforms to choose from, both free and paid. Depending on whether you choose a free or paid option depends on what you’ll need to set it up.
Typically, if you’re using a free blogging platform like LinkedIn or Medium, all you have to do is sign up and start creating right away.
The ease of use sounds good, but I HIGHLY suggest avoiding the free options, as they have more downsides than upsides.
For example, you don’t own the platform, you can’t customize the design of your blog, and you usually can’t monetize your writing once you write it.
I suggest disregarding all the blogging platforms you see and jumping straight to WordPress, the world’s most popular content management system (CMS).
Over 40% of the world’s websites are built using WordPress. As a result, there are many tools, resources, and developers that make building a blog incredibly simple.
When building on WordPress, you need just four things to start your blog:
- Domain: The unique web address (URL) where visitors can access your blog on the internet.
- Blogging platform: WordPress, the content management system where you create, manage, and publish your blog posts.
- Hosting: The service that stores your blog’s files and makes your site accessible on the internet.
- Theme: A pre-designed template that determines the visual layout and style of your WordPress blog.
Don’t worry, I’ll show you which tools to select and how to set them up, every step of the way.
Tip: We’ve built a free course on how to use WordPress, step-by-step. If you get stuck along the way, check that out to clear up the confusion.
The Tech Stack That I Personally Use
I’ve spent the past ten years building blogs and websites full-time.
During that time, I’ve had the opportunity to try almost every popular content management system, host, theme, plugin, and digital marketing tool on the market.
Through a TON of trial and error, I’ve assembled a list of items to power my blog that has proven to be reliable, secure, and scalable, yet still easy to use.
Core Setup: What Powers the Blog
- Domain Registrar: Namecheap
- CMS: WordPress.org
- Hosting: WP Engine (recommended option) or Bluehost (budget pick)
- WordPress Theme & Framework: GeneratePress Premium
Additional Functionality & Features
- SEO: Rank Math Pro
- Forms: Gravity Forms
- Anti-Spam: Akismet
- Caching & Performance: WP Rocket
- Image Optimization: Imagify
- Analytics: Site Kit by Google
This is the same list of items that I use on almost every website I run, including bloggingtips.com. I trust them with my sites and use them every day.
Unlike the large majority of other people who sell blogging-related courses online, I am not just promoting the tools that give me the highest commissions.
I’m also not showing you the cheapest way to build a blog, either (though I do promise that it will still be affordable – with budget options for each recommendation I provide).
However…
… I am showing you the easiest, quickest, and most scalable way to build a blog quickly and efficiently.
It’s important to remember that we’re building a blog the right way from day one. This will save you a lot of wasted time and headaches in the future, including those I’ve personally experienced.
Step One: Get Hosting
If you’re looking for the easiest way to start a blog, sign up for WP Engine hosting.
WP Engine is a type of host known as a “managed host”, a type of hosting that is specifically optimized for WordPress sites to make them very fast and secure.
These hosting plans come standard with features like daily backups, free SSL certificates, threat detection, and staging/development/production environments.
WP Engine is a little bit more expensive than shared hosts like Bluehost (my budget pick below), but offers a FAR superior experience.
In fact, it is is so simple to use that you really don’t even need to know much about technology to use it.
You simply click a couple of buttons and WordPress goes live. From there, WP Engine handles the complicated tech stuff like performance, security, and keeping your site live.
The best part about paying a little extra for hosting is that when you do need help, they have a great support team to help you out. They’ll literally help you fix your site if you break it.
I suggest selecting the “Essential” plan. It comes with everything you’ll need. You can always upgrade later if necessary.

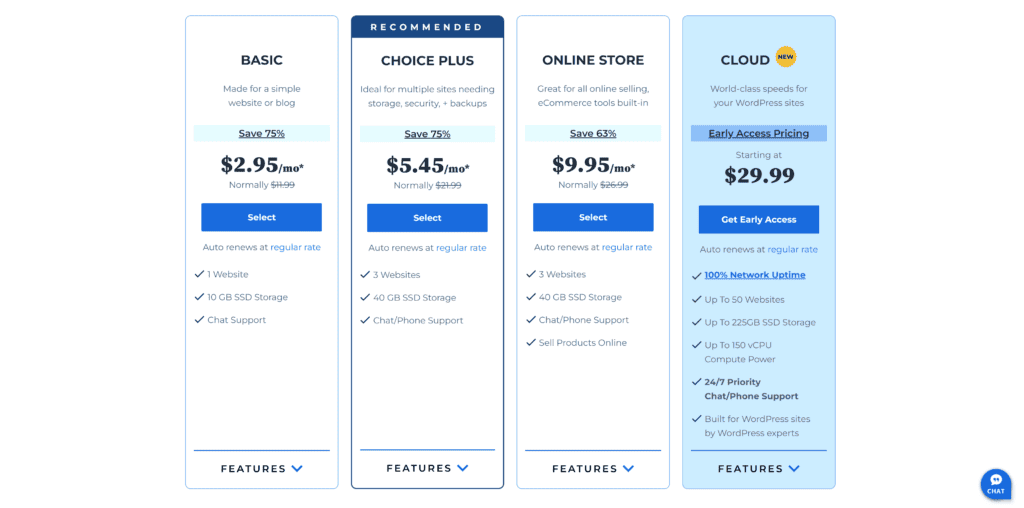
For those looking for the cheapest way to start a blog, sign up for Bluehost.
Bluehost is what is known as a “shared host” which means that your blog will share resources with a bunch of other websites, making it very cheap to get.
For example, you can sign up for a shared hosting plan for $2.95/mo. For slightly more, you can upgrade your resources to allow for more websites and additional storage:
If you’re on a budget, you can get a blog off the ground with Bluehost. However, I encourage you to think twice before you do.
Many bloggers build on Bluehost’s shared hosting because it is super cheap, but they don’t realize that this actually comes at the cost of performance, reliability, and ease of use.
I made this mistake when I first started blogging. I signed up for the cheapest options possible, and ended up spending a lot longer trying to figure out how it all worked.
I then spent even longer trying to fix things when they went wrong (which happens a lot while blogging).
A few key differences to think about:
- WP Engine is as simple as pressing a few buttons to install WordPress or roll back a website backup. Bluehost makes these tasks far more complicated.
- WP Engine offers staging and development environments, Bluehost does not.
- WP Engine excels in handling high volumes of traffic, Bluehost’s shared hosting will slow down when this happens.
- WP Engine handles technical maintenance, security, updates, and optimizations. You will have to learn to do all these things if you choose Bluehost.
In short, Bluehost’s shared hosting is much more difficult and complicated to use than a managed host like WP Engine.
There’s nothing necessarily wrong with choosing a Bluehost shared hosting plan, but I would highly recommend trying to find room in your budget and allocate a little more for higher-quality hosting from the start.
Step Two: Install WordPress
Once you sign up for a hosting account, you’ll need to install WordPress on the account.
First, click the “Add site” button within your customer dashboard.

Decide who will own the site. Unless you’re building a site for somebody else that you plan to transfer to them later, select the “This site is mine” option.
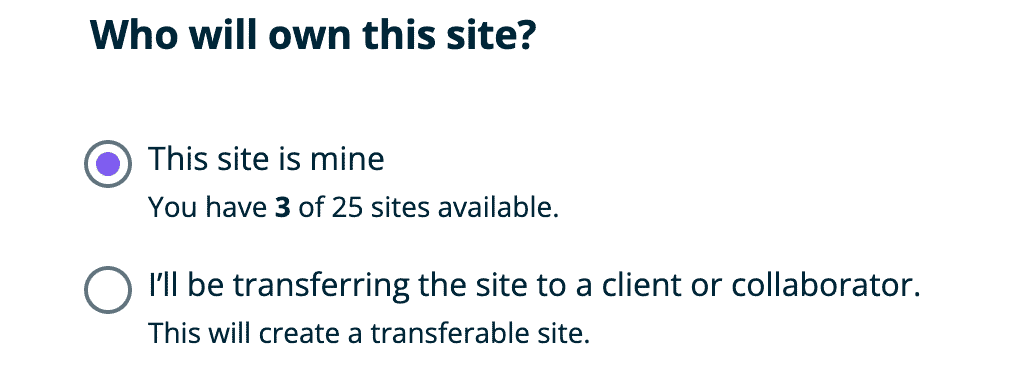
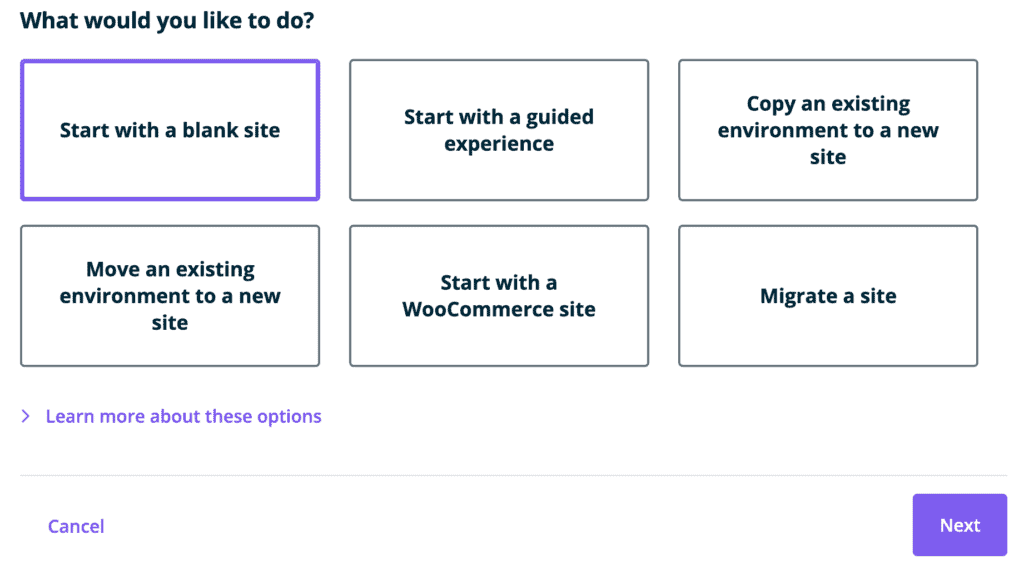
From there, start with a blank site. This will install WordPress on a blank site that you can build your blog on.
The process will take roughly 5-10 minutes to complete. Once the site is built, you’ll receive a notification via email that the site is ready.
The email will include the site URL, the login details, and a link that allows you to set a fresh password for the site.
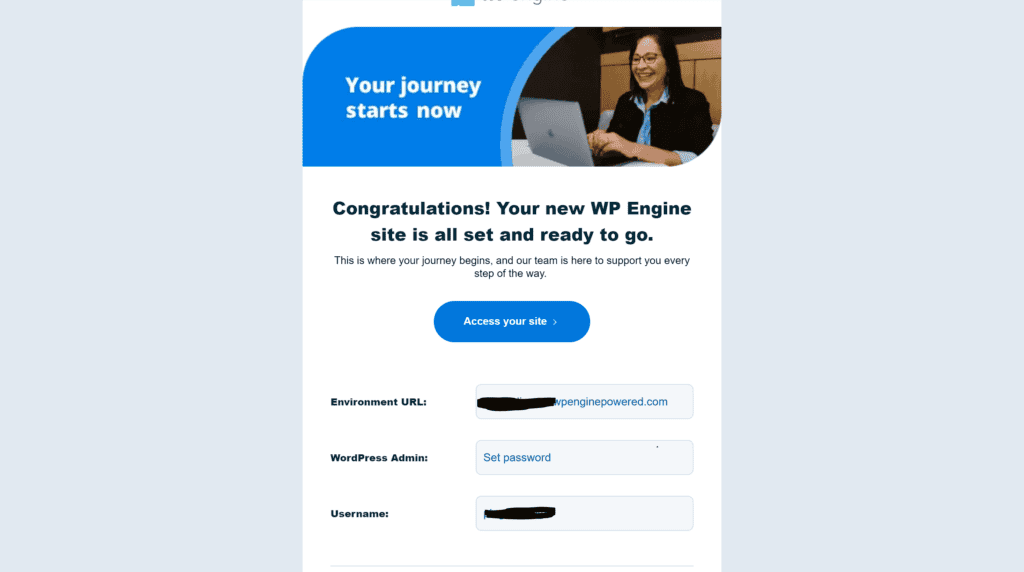
That is literally all that you have to do to launch WordPress on WP Engine.
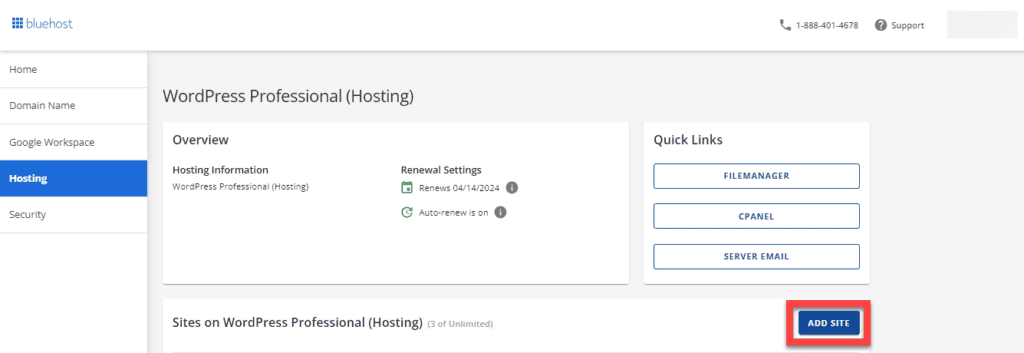
The first thing you’ll want to do is to log into your Bluehost account and click the “Hosting” tab.
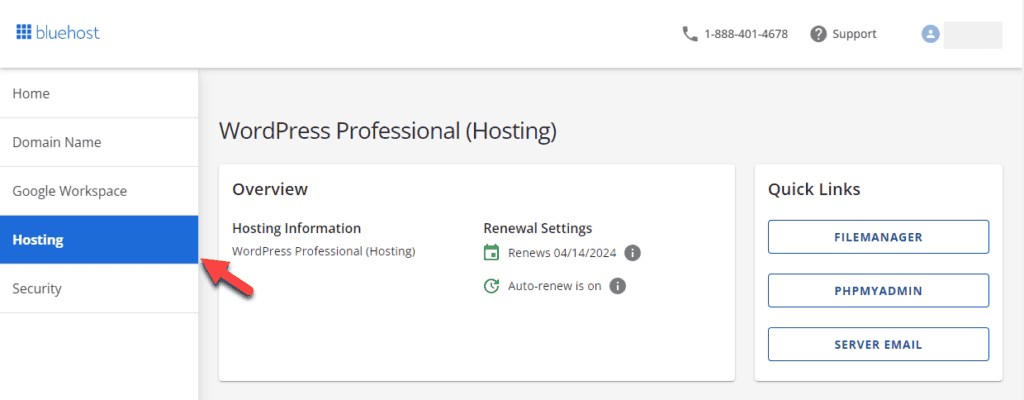
From there, select the “Add Site” button. This will allow you to initiate a WordPress addition to the account.
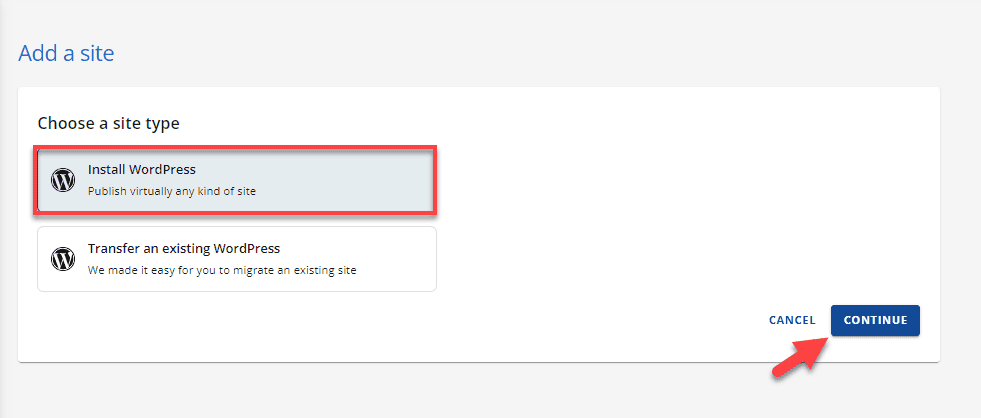
Select “Install WordPress” and then hit the “Continue” button.
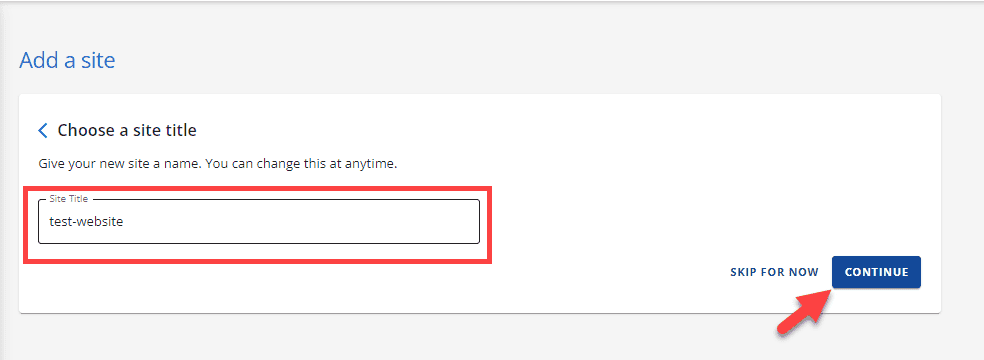
Choose the site title.
This can be anything, but I prefer to have the title be descriptive so that I know exactly which site is which within my account.
Once named, select the “Continue” button.
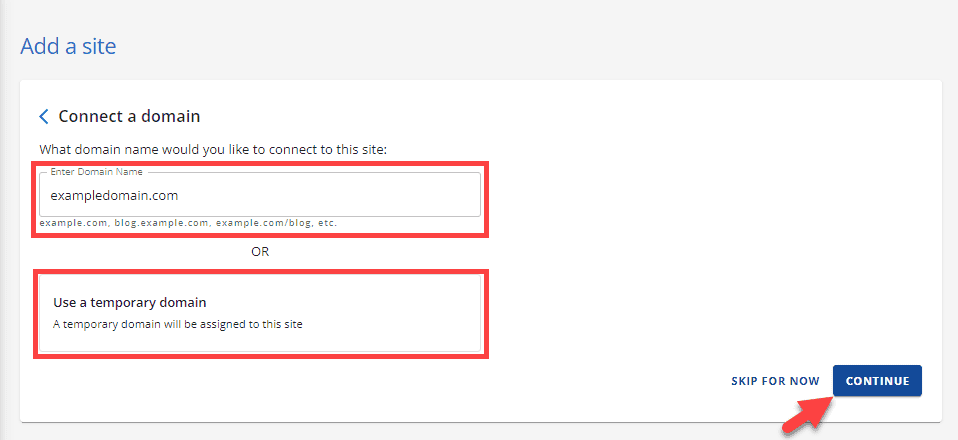
From there, you will need to connect a domain. We haven’t named our blog yet, so I suggest using a temporary domain.
Once we go through the process of naming the blog in the next step, we’ll add that later. Right now, however, a temporary domain that we can build on will allow us to get the blog live.
The system will take a few minutes to install WordPress. Give it 5-10 minutes for it to finish the process.
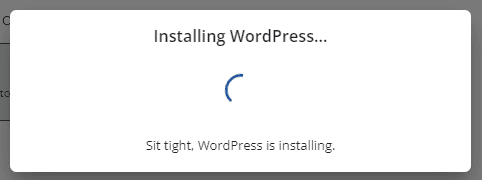
Once installed, you will see an intermodal box pop up that gives a link to the site.
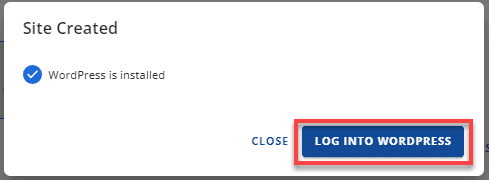
That’s it. You’ve successfully installed WordPress and you’re ready to move onto the next step – selecting a niche and naming the blog.
Once WordPress is installed on your host, you can move onto the second most important step in starting a blog – selecting a niche and a name.
Homework: What to Do at This Point
Our goal right now is to simply get a basic blog off the ground.
We'll gain forward momentum by installing WordPress on our host, and then adding a theme and core plugins.
WP Engine offers staging sites by default, so we can launch a blog without needing to have a domain name.
We’ll eventually name our blog and register a domain, but not until the next step once we’ve decided on a niche and audience to focus on.
2. How to Select a Blog Niche
Once you have your blog live, we’ll want to select a niche and then choose a blog name.
The niche will guide the direction of your blog, and the name will guide the brand. Both elements will work together to bring your authority site to life.
What is a Blog Niche?
A blog niche is the central theme and main focus on a blog. This theme guides the overall direction of the blog and aligns with what type of content that you write about and cover.
Typically, blogs have very engaged and specific audiences in which readers are very passionate about the niche.
For example, a niche website that writes about electric vehicles will have a large audience of people who either own, or are just interested in, electric vehicles.
Or, in the case of BloggingTips, blogging. When you come to the website’s homepage, it is immediately clear which niche we’ve chosen to focus on:
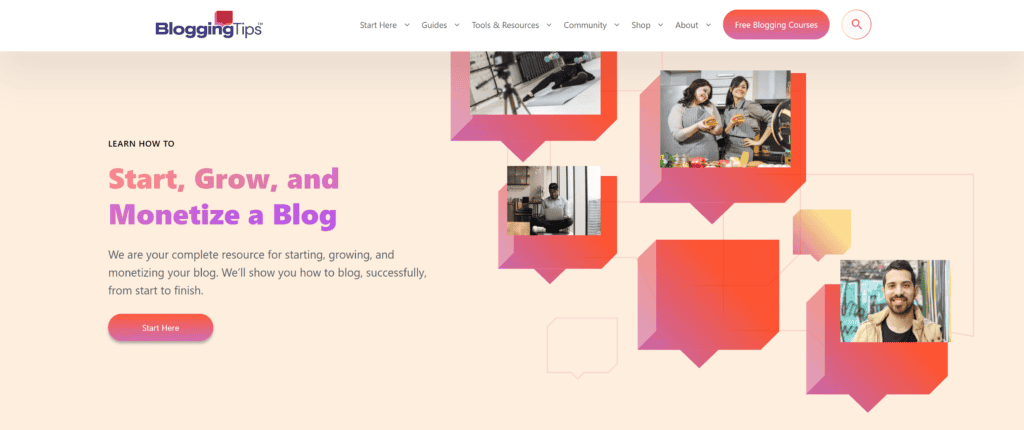
We take that one step further and incorporate that theme directly into our name, providing very little confusion about what we offer readers (more about that in a bit).
Additional Examples of Blog Niches
- TechCrunch: Focuses on technology and startups, providing news, trend analysis, and company profiles. It targets technology enthusiasts, investors, and industry professionals.
- Nomadic Matt: Targets budget travelers with guides, tips, and stories for affordable world travel, appealing to backpackers and cost-conscious tourists.
- Gizmodo: Covers consumer electronics and gadgets with reviews and tech news, catering to gadget lovers and tech enthusiasts.
- Serious Eats: Offers tested recipes, cooking techniques, and food science, appealing to home cooks interested in the science behind cooking and new culinary ideas.
- Ridester: Provides information for rideshare and delivery drivers, educating them on how to sign up for and succeed with gig-related roles.
As you can see, each blog has a very specific focus, and it’s not hard to imagine why people might choose to follow the expert advice from these blogs.
The Importance of Choosing a Blog Niche
Let me first start by saying that choosing a blog niche is not something that you should rush through. Taking time to think through your niche initially will save you headaches in the future.
First, without a clear niche, content can become disjointed and unfocused, confusing readers and making it hard to build a loyal audience.
Next, without a niche, it’s harder to rank in search engines, as your blog lacks topical authority and clear keywords to target.
It is also hard to demonstrate E-E-A-T, a huge factor in ranking content on Google (and growing more important every day).
Lastly, monetizing a blog is more challenging when the audience is not well-defined. Advertisers and affiliates prefer to invest in blogs with a targeted, engaged audience.
I’ve made this mistake far too many times in the past and have spread myself too thin in the process.
It’s MUCH easier to define the niche and direction from the start than it is to try to focus the blog, delete unrelated content, and do the extra work later.
Selecting a blog niche may seem overwhelming, but it really just comes down to a handful of steps:
- Determining what you’re interested in and passionate about.
- Researching to gauge if there is an interest or market opportunity for that niche.
- Researching the industry, competition, and potential opportunities.
- Determining how you’ll grow the blog and make money in the niche.
Again, take your time and don’t rush the process. Take your time with each step and really think through each one as you go.

1. Assess Your Interests and Expertise
Choose a niche that aligns with your passions or professional skills. This makes it easier to sustain your interest over time and provide valuable insights to your readers.
Your expertise and passion for a niche will show in your writing. If you don’t really understand a niche, you probably shouldn’t be trying to create a blog in that niche.
Trust me, I’ve made this mistake before. I once owned a website in the beauty niche – one that I know absolutely nothing about.
That website fell flat on its face because I had no idea what I was talking about and no idea how to engage with the audience.
I am know a lot about digital marketing and I’m also passionate about helping others start an online business, you can probably tell in my writing that I know what I’m doing.
Despite what other “experts” will tell you, there’s no such thing as quick money online. You’ll have to prove yourself as an expert, put in the work, and the rewards will come with time.
2. Research Market Demand
Next, it is important to select an evergreen niche that will be around in the future.
Explore if there is a readership for your chosen topic. Use tools like Google Trends or social media platforms to gauge interest levels and see what related topics people are discussing.
3. Consider the Competition
Look at other blogs in your potential niche. Identify what they do well and where there might be gaps you can fill. This can also help you find a unique angle for your blog.
4. Think Long-Term
Select a niche that you can see yourself writing about for years to come and that has the potential for ongoing relevance. Avoid overly trendy topics that might not have staying power.
5. Match It to Your Goals
Align your niche with the objectives you have for your blog. If it’s a business blog, your niche should be closely related to your products or services to attract the right audience.
How to Brainstorm Ideas & Choose a Blog Name
1. Align With Your Niche, & Message, & Audience
2. Research Research Research
3. Make it Creative, Yet Simple
4. Check Availability
5. Consider Your Brand
5. Get Feedback
How to Register a Domain Name
Once you have a niche and a blog name, the next step is to register a domain.
By this point, you should have done all the research you need, so this should be as simple as visiting Namecheap and registering a domain.
This is a simple process. You simply need to type your desired domain into the search box and you’ll see whether or not the domain is taken.
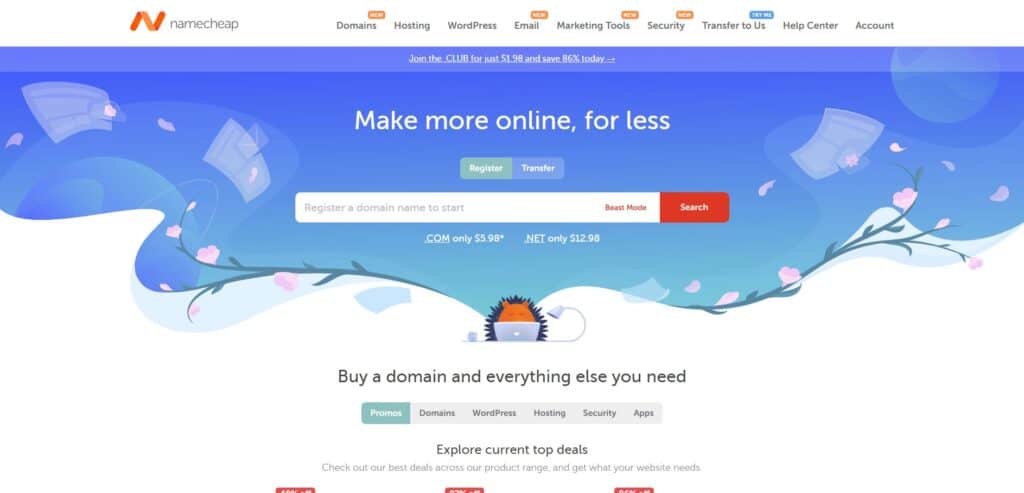
If it is, keep searching until you find one that you like and that is not taken.
Like I’ve mentioned so many times above, don’t rush the process. You can always change the domain in the future, but it’s a lot easier to find one you love at this point than to change it later.
Homework: What to Do at This Point
Our goal at this point in the process is to choose a niche and a blog name.
The focus of our blog is the "North Star" of our entire blogging efforts, our guiding light that now directs our strategy and actions.
Once again, take your time during this process. It's important to get it right now than to deal with avoidable problems later.
Pro Tip: Disregard the “Experts” and Take Your Time
There are countless experts out there claiming that making money through your blog is easy, but let me be clear: it IS doable, but it’s not as easy as some might make it sound.
We’re bombarded by blogs, links and newsletters stating how this person ‘made a six-figure income’ or how that person ‘lives from the income their blog generates’.
What you don’t see is the tireless hustle in building the blog. The grit to stay the course when things get tough. Or the countless nights spent building away without any type of recognition as a result.
Ultimately, however, you need to remember that making money with your blog takes hard work, dedication, and patience.
It won’t happen overnight. You need to lay the foundation now to reap the rewards that blogs can offer later.
But don’t worry. I’ll be with you every step of the way showing you how. I’ll offer my thoughts, insights, and guidance.
By learning the proper way to build a blog from the start, you’ll save yourself a huge amount of time and avoid plenty of headaches in the future.
course content [page jump]
Related Courses
In addition to starting a blog, I also suggest:
- Starting a YouTube channel: a great way to showcase hands-on expertise.
- Starting an online store: take advantage of the ecommerce boom currently happening.
- Starting a podcast: capture the podcast market, which is rapidly growing in popularity.
- Creating an online course: another great way to showcase your experience and drive engagement.
- Making a website: a great way to expand from a smaller blogger into an authority site owner.
Course Content
Building A Blog
About Instructor
Course Includes
- 10 Lessons
- 49 Topics